Natural Beauty Spring Makeup {Easy Drugstore Makeup Tutorial!} #WalgreensBeauty
I am a member of the Collective Bias® Social Fabric® Community. This shop has been compensated as part of a social shopper amplification for Collective Bias and its advertiser. #WalgreensBeauty

This year, I’m trying to build on my strengths and strengthen my weaknesses in all areas of my life. I’m applying this same philosophy to my everyday beauty routine. I’m learning which beauty products accentuate my strong points, and which products can help me correct my flaws without slathering my face with makeup. Thankfully, the natural beauty look is completely on trend for spring 2014. I’m also infusing new life into my makeup by embracing the spring makeup trends that fit my personality and style: cat eyes, glowing skin, and petal-inspired hues. I stopped by Walgreens to pick up a few new makeup products, and I naturally had to put them to the test immediately. Here’s a breakdown of the trends that I’m embracing for the spring season as well as an easy step-by-step tutorial for my natural beauty makeup look!

To achieve a glowing complexion, I recommend using more concealer and less foundation. The concealer will allow your to conceal your flaws, and topping your skin with a lightweight foundation will even out your skin tone while still looking like real skin and not a mask. Apply a setting powder in areas where you need extra coverage and to set the foundation in place.

// //

Step 1: Apply Foundation:
I picked up the Revlon Age Defying Firming + Lifting Foundation from Walgreens, and it was love at first application. This lightweight foundation has light coverage and feels like a thin moisturizer. Once applied, it helps to even out your complexion and feels exactly like your normal skin. It feels like you have no makeup on at all! The foundation leaves your skin glowing without looking greasy or shiny.
Step 2: Apply Concealer
I used the Physician’s Formula Conceal RX concealer under my eyes and over any blemishes or discoloration. Blend with your fingers or a small brush.

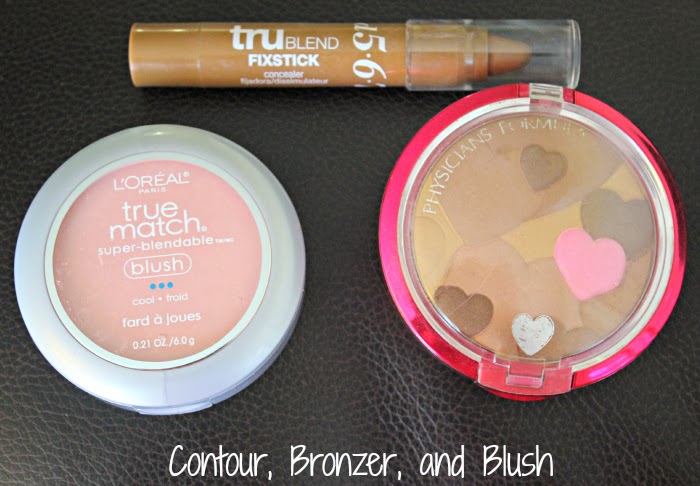
I use a stick concealer in a dark shade to contour my cheekbones, and I top the creme product with a slightly shimmery bronzer to achieve a healthy glow to my complexion. The Physician’s Formula Healthy Booster Bronzer leaves a natural sheen to the face without leave shimmer or glitter. I finish my cheeks with a light rosy blush. L’Oreal Paris True Match in Baby Blossom is a light pink that leaves your cheeks with a natural, healthy flush. I’m so happy that I picked it up from Walgreens!
// //
Step Three: Set Foundation with Pressed Powder
Apply pressed powder to any areas that appear overly shiny and lightly dust over face to set foundation and concealer.
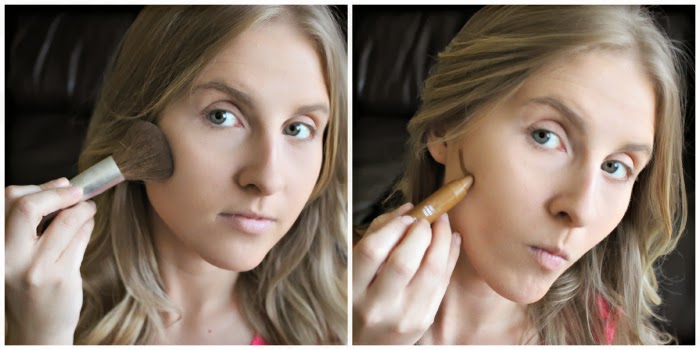
Step Four: Add Cream Contour
Apply a stick concealer that is a few shades darker than your natural skin tone directly under your cheekbones. Suck in your cheeks to able to clearly see your cheekbone. Blend with your fingers or a blush until there isn’t a harsh line.

Step Five: Apply Powder Bronzer
Continue sucking in cheeks to define around your cheekbone, and add a soft wash of bronzer below your cheekbones and along the sides of your face and jawbone.
Step Six: Apply A Natural Blush
Softly smile and apply a light pink blush to the apples of your cheek and in a diagonal line up to your ear. Blend so there are no harsh edges.

The metallic trend is still going strong from fall and winter, but you’ll want a softer finish for the spring season. By using light neutral metallic tones mixed with matte products, you’ll achieve a slightly metallic eye that’s on trend for the spring season. To make your eye makeup last all day, I recommend starting with a cream eyeshadow and adding a layer of powder eyeshadow on top. Pencil eyeshadows make creating the perfect shape simple and fun!

CoverGirl Flamed Out Pencils in and // // // L’Oreal Paris Infallible Eyeshadow in Endless Pearl

Step 7: Apply Creme Eyeshadow and Top with Matte Shadow
I first applied a thin layer of Maybelline 24Hr Color Tattoo cream eyeshadow in Barely Branded to my lids, and I topped it with a matte vanilla eyeshadow, L’Oreal Paris’ Infallible Eyeshadow in Endless Pearl.
Step 8: Apply Pencil Eyeshadow
I used the CoverGirl Flamed Out pencil in Melted Caramel Flame, a metallic taupe, to add dimension to the eye and create the shape I wanted for my eyeshadow.

Step 9: Top with Powder Eyeshadow
I topped the pencil eyeshadow with CoverGirl’s eyeshadow along the crease of my eye. Blend to create a smooth edge.
Step 10: Highlight Inner Corner and Lower Lash Line
To add a bit of brightness to this natural spring beauty look, I used the CoverGirl Flamed Out pencil in Ginger Flame to line the inner corner of my eye as well as along my lower lash line.

Cat eyes are a classic trend from the 50s that has recently made a huge comeback. To create a natural cat eye easily, I recommend using a felt tip liquid eyeliner. The felt tip brush makes the process so simple and basically foolproof. A few coats of mascara will accentuate the natural eye look and make the cat eye liner pop!


Step 11: Create Cat Eye Liner
Use a felt tip eyeliner to draw a thin line from the inner corner of your eye to the outer edge. Slightly flick up your eyeliner a few centimeters past the edge of your eye.
Step 12: Fill in Eyebrows and Add Mascara
Fill in any sparse areas of your eyebrows with an eyebrow pencil a shade lighter than your eyebrow’s natural color, and a few coats of mascara to your upper and lower eyelashes.

Spring beauty is fresh and natural, and rosy lips fit this description exactly. Choose a shade similar to your lip color but with a rosier hue. Add a little bit of lip liner in a shade similar to your natural lip color to make your lips appear fuller. The new L’Oreal Extradordinaire glosses are amazingly shiny and have a smooth finish without any stickiness. I picked up the shade Rose Melody from Walgreens, and it’s my new go-to spring lip color! I can’t wait to pick up more colors from this line.


Step 13: Line Lips
Use a lipliner similar to the natural shade of your lips. Line the edges of your lips and blend with your finger over your entire lip area.
Step 14: Add a Rosy Gloss
Apply a coat of rosy lip gloss over your lipliner to create shiny, full lips

My finished look amplifies my natural beauty, and the best part is- it doesn’t feel like I’m wearing any makeup at all! My new Revlon foundation and L’Oreal Extraordinaire lip gloss have the most lightweight finish, so I literally feel like I’m in my natural skin. This spring, I encourage you to play with the Spring 2014 runway trends and accentuate your natural beauty! Always remember that you don’t need to spend lots of money on fancy makeup. This entire look was completed with drugstore makeup that you can easily find at Walgreens for low prices!