• about
  • beauty
  • style
  • Ashley Brooke Nicholas

  • life
    • health + wellness
    • diy + crafts
    • travel
      • florida travel
      • things to do in orlando
  • mom + baby
    • pregnancy
    • motherhood
    • baby
    • toddlers
    • kids
  • home
    • home decor
    • entertaining
    • holidays

Ashley Brooke Nicholas

DIY Wrapping Paper with Sprout by HP

hp-sprout-computer-4164
Some people can’t resist chocolate. Others have a hard time saying no to a new pair of shoes. My ultimate weakness is gift wrap. Whenever I go shopping, I inevitably seem to add one or two rolls of gift wrap to my shopping cart. Cats wearing sunglasses? Yep, I need that on gift wrap. Rainbow polka dots? That’s a gift wrapping necessity. In the past, my gift wrap addiction was limited by the selection at my local stores. Thankfully I just discovered an incredibly easy way to make custom gift wrap at home, and my gift wrapping game has been taken to a completely different level! Thanks to my new  by HP I can make any gift wrap I want at home in minutes without any formal design training or even a general awareness of tech-y computer features. The HP  is pretty much the coolest computer I’ve ever used, and I can safely say that it’s an absolute necessity for makers of any kind. If you are involved in design of any kind, this computer is going to change your life- especially if you’re not already an incredibly tech-savvy person. The performance and design capabilities of this computer are phenomenal, and the features couldn’t be easier to use. When I first received my Sprout, I immediately wanted to test out its 2D and 3D scanning capabilities. I scanned almost every single item in my house, and I was in total awe the entire time. I kept yelling at my husband letting him know about my discoveries. Here’s a short summary of my first evening with my computer: “OMG, you’ve got to see this candy I scanned!” “Wait, what?! I can create 3D replicas of my entire lipstick collection?!” “Look at this flower I scanned! I am a designing master!” “Ryan, I think I am in love with a computer.” After I scanned at least 2 dozen items, I decided it was absolutely necessary to create custom gift wrap for every holiday and social event on my agenda. Today I’m going to share how I created my DIY wrapping paper in 3 easy steps!

STEP 1: SCAN YOUR ITEMS WITH THE HP SPROUT

hp-sprout-computer-4084

For this project,  I used the the Sprout’s overhead camera to scan various household objects I wanted to use in my wrapping paper designs.

hp-sprout-computer-scanning-4110

Halloween is just around the corner, so I decided that my first project would be candy corn wrapping paper. I simply spread out the candy corn on the HP Sprout’s project mat, turned on the overhead camera, and clicked the capture button.

hp-sprout-computer-scanning-4106

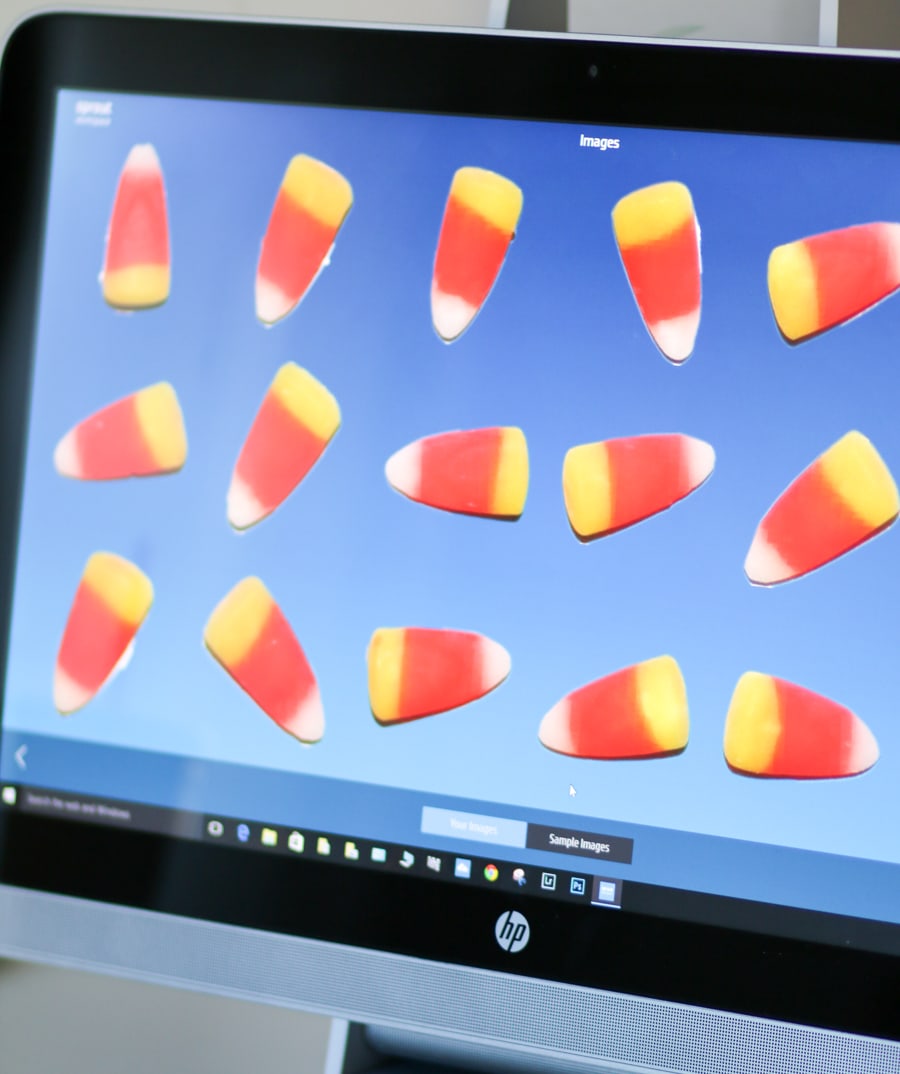
Within a few seconds, I had digital versions of each candy corn. The Sprout with 3D Technology features a touch screen, so I was able to drag each piece around into a design that worked well for my wrapping paper. The computer allows me to interact with my content in a natural, hands-on manner that’s incredibly intuitive. While I just moved the pieces around into a different pattern, you can easily layer, re-size, or manipulate scanned images to your liking.

hp-sprout-computer-scanning-4120

hp-sprout-computer-scanning-4117

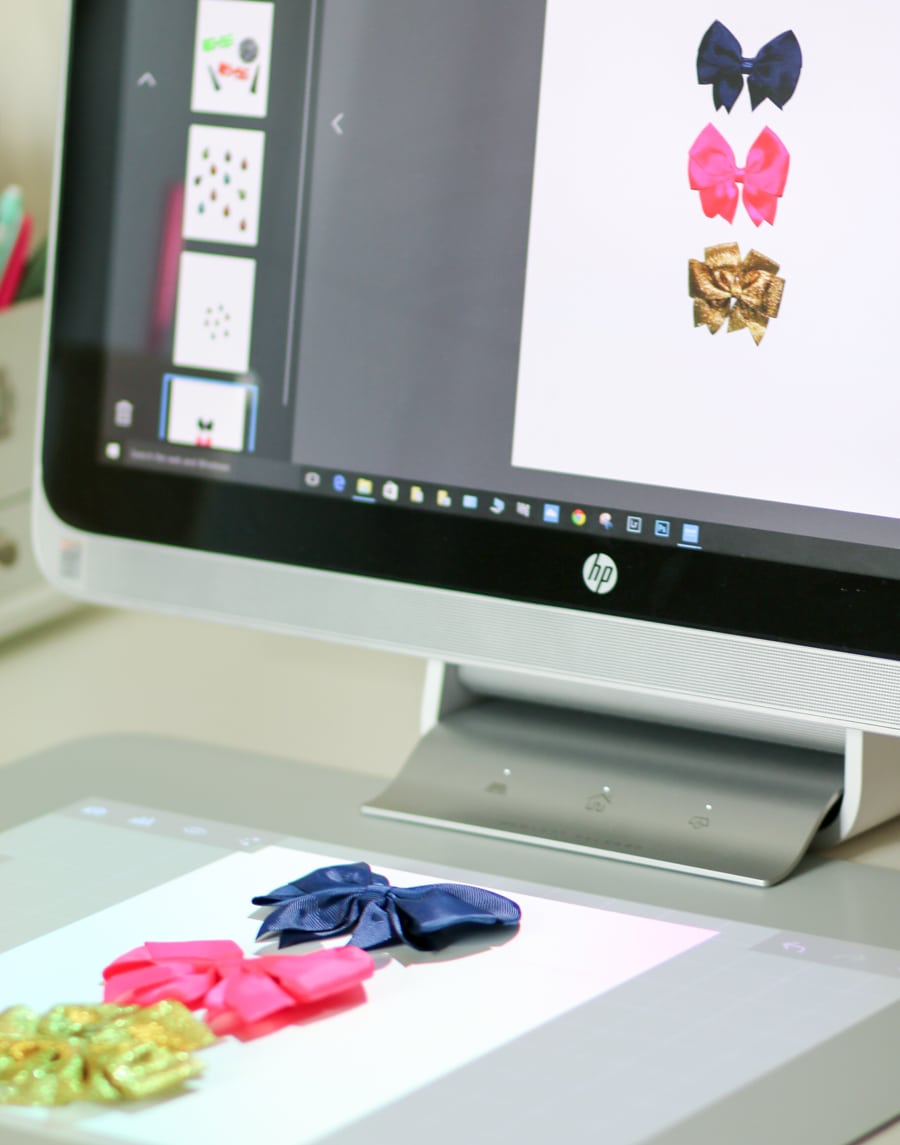
I got a little scanner-happy and decided to capture my great grandmother’s pearl necklace as well as a few cute bows I’d picked up for fall.

hp-sprout-computer-3d-capture-stage-4517

While this project only called for 2D images, the Sprout is also compatible with the 3D Capture Stage by HP. I simply plugged this compact 3D scanner into my computer’s USB port, and I was able to capture accurate 3D models of so many items. Be on the lookout for several cool 3D projects on the blog over the next few months!

STEP 2: CREATE A COLLAGE OF YOUR SCANNED IMAGES

Once your images are scanned and perfectly designed, it’s time to create the file for your wrapping paper! I simply copied and pasted my images in Microsoft Publisher to create a large image file for printing; however, you could easily use Photoshop, PicMonkey, or any image editing software that you like to create an image file.

STEP 3: PRINT YOUR FILES

diy-make-your-own-wrapping-paper-4195 The last step is to print out your designs! I sent my image files to a local printer to print on large paper in high resolution, but you could easily print a smaller version at home!

diy-make-your-own-wrapping-paper-4477

hp-sprout-4479

I couldn’t be happier with my three wrapping paper designs, and I already have plans for a least a dozen more designs. Let’s just say I might win the “best wrapped gift” award at my family’s Christmas celebration this year!

hp-sprout-computer

hp-sprout-computer-4082

This type of project would have been way out of my technical scope without my Sprout computer. Even though I work in digital content creation, I lack the technical skills to make my creations come to life. The makes creative projects incredibly easy, and it’s also a perfect fit for my business needs. If you think I’m exaggerating the awesome-ness of this device, just go ahead and take a look at the #GoMakeThings and #SproutByHP hashtags on Instagram or browse through the. I guarantee that you’ll be inspired by the amazing projects that makers around the world have created!

What wrapping paper design would you create?

Thanks to HP for sponsoring today’s post!

Share

You May Also Like

December 20, 2013

Last Minute Christmas Gift Idea: Movie Night Basket {Featuring Hot Cocoa, Popcorn, and Beef Jerky!} #EasyGifts

July 14, 2014

beautiful mornings with lifeway kefir

August 11, 2017

How to Build Confidence

Hi, I’m Ashley!
Hi, I’m Ashley!

Hi, I’m Ashley!

I'm a mom of two girls with a baby boy due this September. I'm passionate about creating a positive online community for women to help them make the most of each and every day!

Search

  • home
  • about
  • contact
  • shop

COPYRIGHT © 2021 ASHLEY BROOKE NICHOLAS. ALL RIGHTS RESERVED. Site Powered by Pix & Hue.