Easy DIY Gifts for Mom Made with Cricut Joy and EasyPress2
This is a sponsored post written by me on behalf of Cricut. All opinions are 100% mine.

While I like to think of myself as a creative person, I’ve always lacked the skills needed to actually bring the ideas in my head to life – until now! I recently got the chance to try out a few new products from Cricut, and oh my goodness, my crafting game has done a full 180. I’ve created so many fun projects over the past few weeks – everything from toddler activities to home decor items to gifts for our loved ones!
Today I’m sharing three easy DIY gifts for moms that are perfect for Mother’s Day, birthdays, or any time you’d like to show a little love to the women in your life! You can also use the techniques shown to make gifts for everyone in your family. Keep reading to learn how to make custom t-shirts for kids, easy DIY coasters, and DIY Mother’s Day cards using the ! All three tutorials are quick, easy, and affordable to complete, and most importantly, are so much fun to do!
Easy DIY Mother’s Day Gifts for Mom

Today we’ll be making three easy DIY crafts for mom that are perfect for Mother’s Day gifts. All three of the projects use , and these machines seriously make these projects and a million more SO easy. You simply use the Cricut Design Space website or app to create the project of your dreams (from scratch or using one of their many beautiful templates), use the Cricut Joy to cut out your design on your preferred material, and then apply either with your hands, a tool, or in the case of two of today’s projects, the Cricut EasyPress2. Today I’ll be sharing one project I made up myself along with two of the templates from Cricut Design Space to show you just how easy it is to create professional-looking crafts without prior experience or extensive creative talent!
Here’s a little background on each item, so that you can determine what’s the best fit for the projects you have in mind.
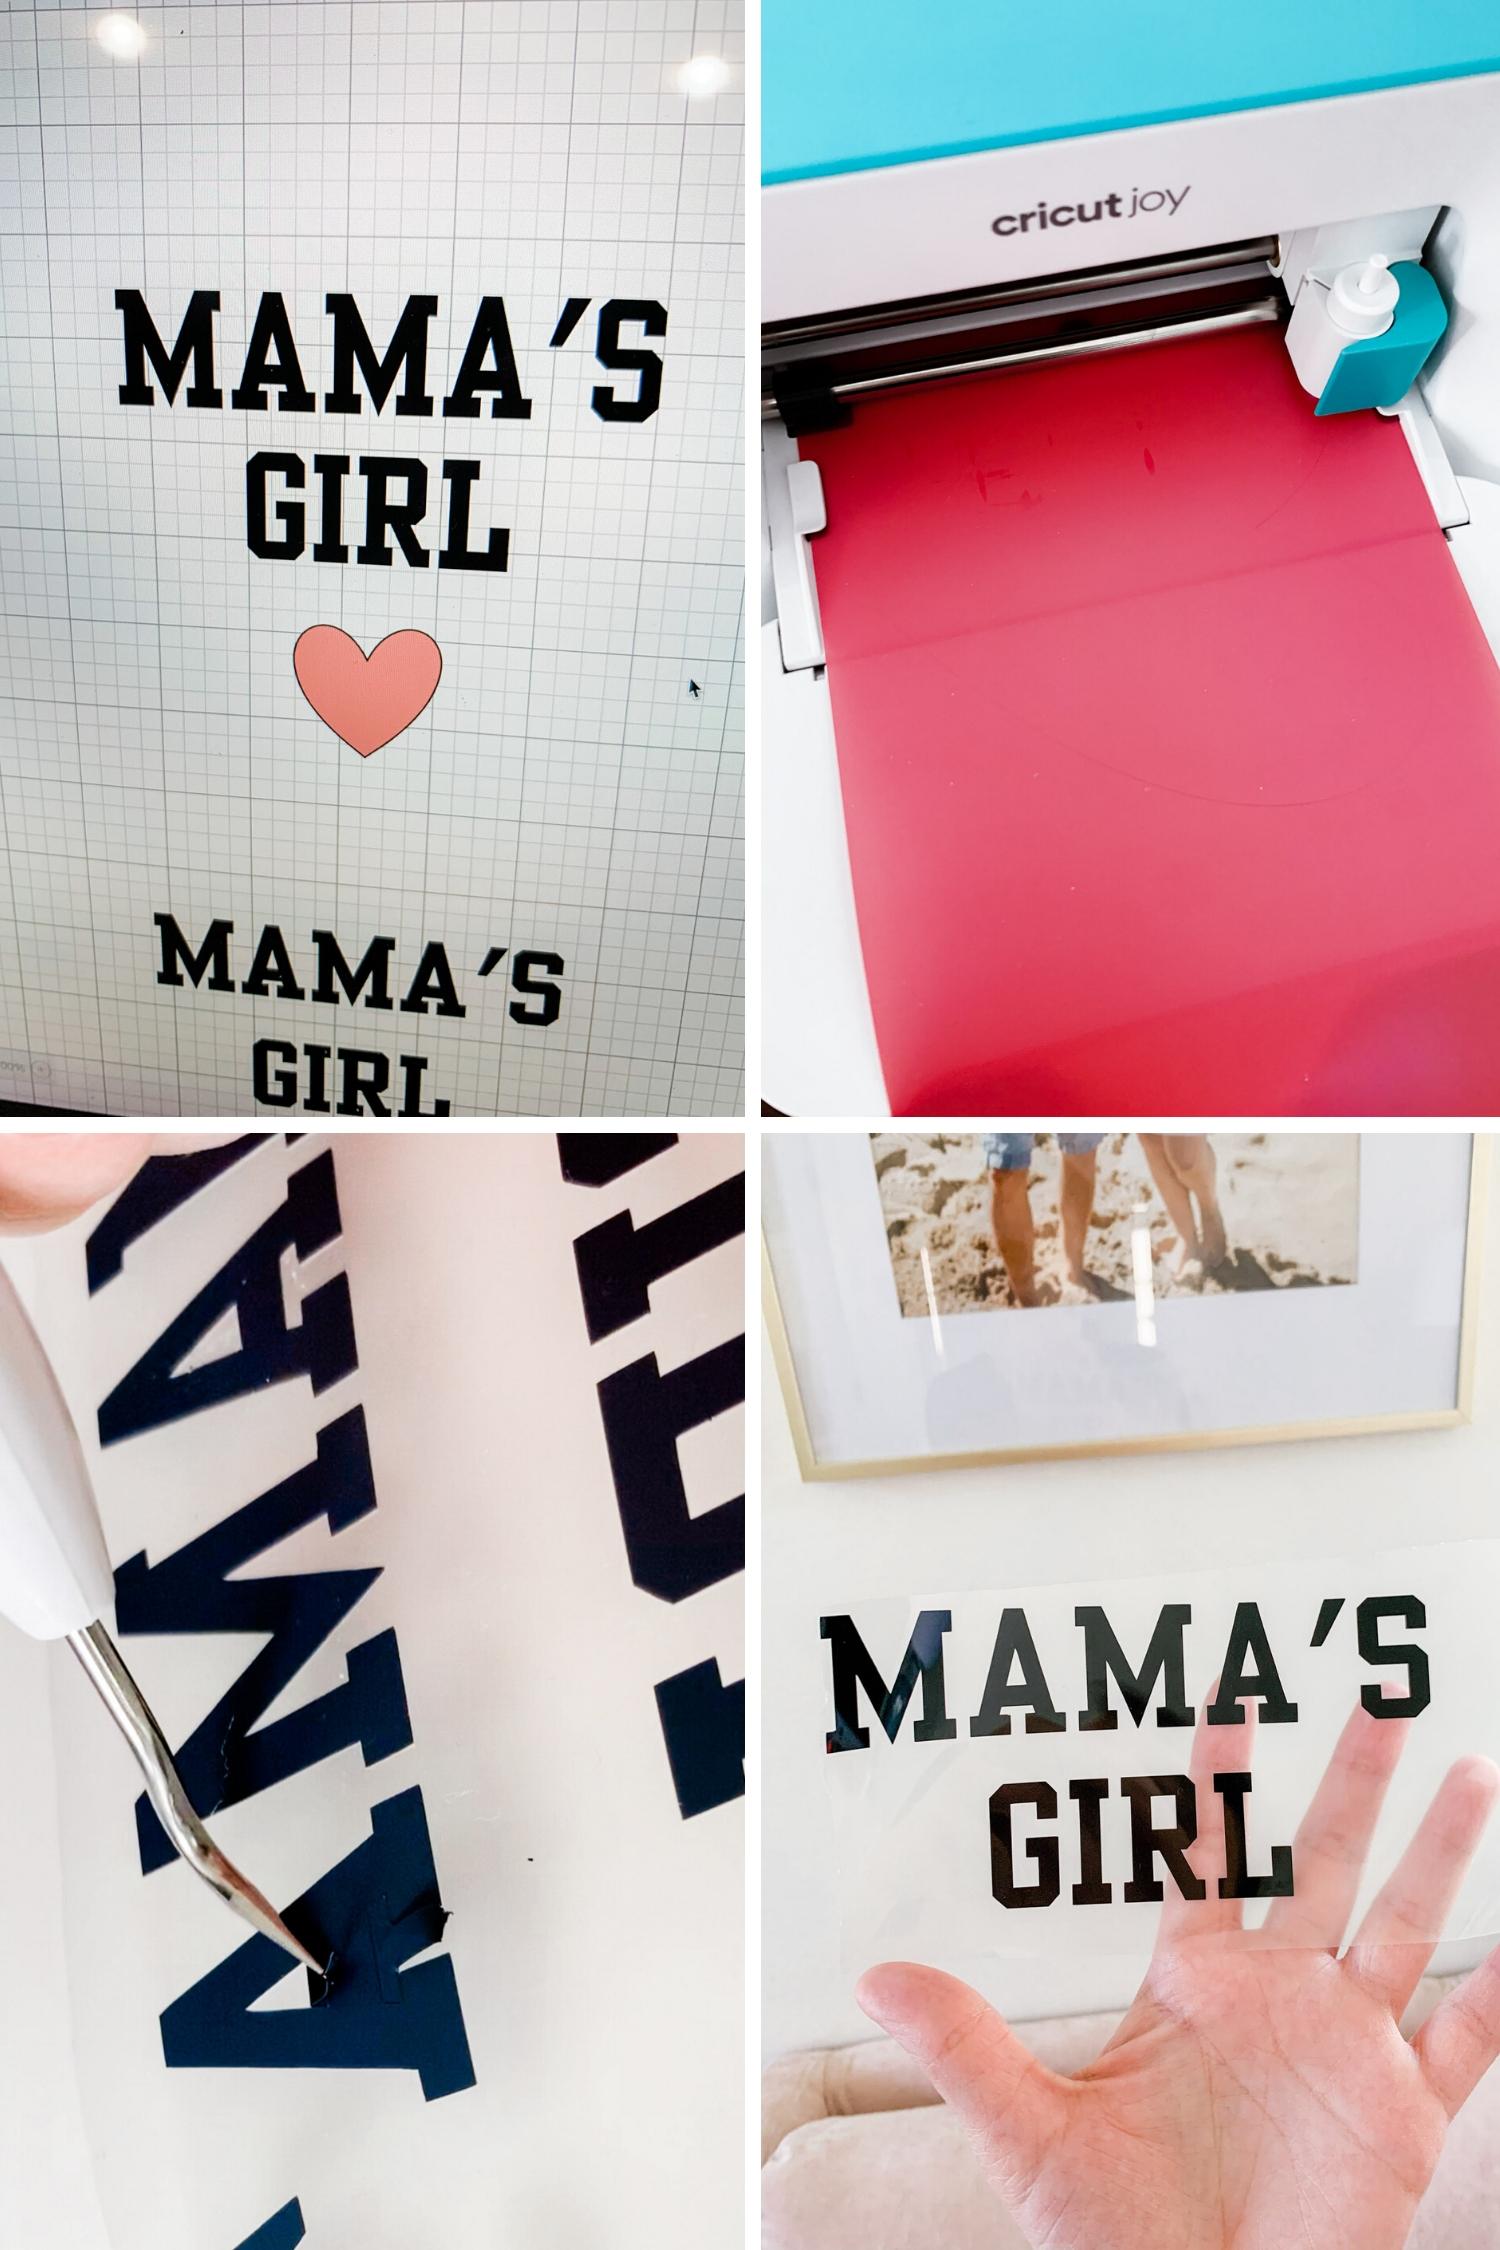
Cricut Joy

The is the ultimate tool for crafters from beginner to professional. As I mentioned earlier, I am not an ultra-crafty person, and I was able to pick up the Cricut Joy software and machine use with zero issues. The instructions included are intuitive, and you literally just design, initiate a cut, and then apply the cut-out design to your item.
The Cricut Joy has a precision blade that can cut a variety of materials into any shape you can image. Whether you want to create labels for your organizational bins, stickers for your planner, monograms for your coffee tumbler, or literally anything you can dream up, Cricut Joy makes the process quick and easy without taking up too much space in your home. Along the with ability to customize just about anything with tons of popular materials (iron-on, cardstock, vinyl, paper, and more), you can also use pens to draw any shape your mind can think of.
The Cricut Joy is compact, portable, and ready to go at all times. You can make cuts on one image up to 4.5 inches wide and 4 feet long or make a repeated cut up to 20 feet long! The machine has built-in Bluetooth, so it connect easily to all of your devices without needing an internet connection! The free Cricut Design Space app and computer program features tons of incredible step-by-step help, amazing designs and tutorials for you to use, and gives you the ability to upload your own designs and fonts. This machine seriously does it all!
.

Have you ever wanted to make custom t-shirts? Or maybe you’ve dreamed about a certain design of tote bag, coaster, or pillow that just doesn’t exist in stores? The is what you need! The Cricut EasyPress2 helps you make professional-quality heat transfers of any design – including the items you just cut from your Cricut Joy!
It’s safe to use at home thanks to an insulated safety base to protect your work surface and an auto-shutoff features that turns off the device after 10 minutes of inactivity. The ceramic-coated surface gives you the ability to transfer images like a pro, and the easy software and buttons allow you to precisely control temperature up to 400°F. So far, I’ve used my Cricut EasyPress2 to create custom t-shirts, baby onesies, and even custom coasters. There are so many options, and it’s so much easier than you may think!
.
DIY Custom T-Shirt Tutorial

If you’re looking for a cute and creative Mother’s Day gift or maybe just want to take a fun Mother’s Day photo with your children, consider making a custom t-shirt! I asked my husband for a framed photo of me with my two girls for Mother’s Day, so he helped me create adorable matching custom Mama’s Girl t-shirts for my daughters and took our photos.
This project is such a fun, easy, and thoughtful way to show the people in your life how much you care. It would also be a FANTASTIC idea to send to grandparents who may currently be unable to visit their grandchildren. Imagine how thrilled your parents would be to receive a framed photo of their grandchildren wearing shirts that say “We Love Grandma” or “Grandma’s Girl” as a surprise!
How to Make Custom T-Shirts with Cricut Joy
MATERIALS NEEDED: Cricut Joy, Cricut EasyPress2, Cricut EasyPress Mat, Cricut Smart Iron-On (all available at ), and your desired clothing items. You can also use this method to create custom pillows, tote bags, and more!
Step One: Create Your Design
Cricut has free software on their website called the Cricut Design Space that allows you to create your own design project or use one of their pre-designed templates. It’s so easy to make your crafting dreams come to life with their software.
I knew that I wanted my daughters’ shirts to say “Mama’s Girl” with a heart, so I simply found a font that I liked, typed in the desired phrase, and added a heart underneath using the “shapes” feature. I measured the width that I wanted the wording to be on Summer’s t-shirt and Luna’s onesie and expanded the text and heart to the correct size on Cricut Design Space.
If you don’t want to start from scratch, you can use the templates in Cricut Design Space to get started. They have so many cute designs for you to use and/or customize.
Step Two: Cut Your Design with Cricut Joy
Next, I used the Cricut app (can also be done on your computer) to initiate my Cricut Joy to cut my design. I simply inserted a strip of Cricut Joy Smart Iron-On into my Cricut Joy, mirrored my image inside the Cricut app, and used the app to initiate the cut.
Step Three: Remove The Edges
Next you’ll want to peel the background off of your Cricut Joy Smart Iron-On cut. It comes off very easily, but you’ll want to peel gently around your design just in case.
Step Four: Weeding
I highly recommend using a Cricut weeder from the Cricut Joy Starter Tool Set to remove any small pieces (for example: the space in the letter A) from the background without damaging your design. This step is called weeding. The weeder makes the process so quick and easy!

Step Five (optional):Repeat Process with Any Remaining Materials
For my design, I wanted to use two different materials, so I repeated the four steps above to design, cut, and weed hearts using Cricut Joy Smart Iron-On material in my Cricut Joy.
Step Six: Determine Correct Heat Settings & Pre-Heat Cricut EasyPress2
You can use the Cricut app or website to determine the correct heat settings of your Cricut EasyPress2. It will also tell you the amount of pressure that needs to be used, and the correct timing of the heat pressing for the item you’ll be customizing.
Step Seven: Pre-Heat Your Shirt’s Fabric
I highly recommend using a Cricut EasyPress Mat underneath your shirt for optimal results. It really creates the perfect heat-safe surface for pressing all types of items, including custom t-shirts made with the Cricut Joy. Before you apply your designs, you’ll want to use the Cricut EasyPress2 to pre-heat your shirt’s fabric. Simply apply light pressure to your item for about 5 seconds to pre-heat the fabric and remove any wrinkles.

Step Eight: Use Cricut EasyPress2
After your Cricut EasyPress2 is pre-heated to the recommended heat settings and the correct timer is set, put your t-shirt on the Cricut EasyPress mat, apply your design (or in my case, the first part of the design), and press the design onto the t-shirt. In my case, I was instructed to use a temperature of 315 degrees with light pressure for 30 seconds on both my 100% cotton t-shirt and cotton and polyester blend baby onesie.
You’ll simply apply the Cricut EasyPress2, hit the Cricut button to start the timer, and wait for the timer to run out. The process couldn’t be easier!
Step Nine: Press The Back of Your Shirt
Next you’ll want to use the Cricut EasyPress2 on the back of your shirt for the correct amount of time. In my case, it was an additional 15 seconds of 315 degree heat with light pressure.
Step Ten: Carefully Remove Backingfrom Design
After pressing the back of the shirt, flip over your custom t-shirt and test lifting up a small piece of the corner of the design. If it removes easily, continue removing the entire backing. If it pulls and doesn’t lift up easily, try pressing the t-shirt again. It’s very important to test this out while the shirt is still warm!
DIY Custom Baby Onesie

You can use this method to create any type of custom project – including custom baby onesies. These are such a fun idea for baby shower presents or even a creative baby shower activity! You could easily make a dozen custom onesies for a mom-to-be for a low cost.

I LOVE these adorable Mama’s Girl shirts that I made for my daughters, and I can’t wait for them to wear them again on Mother’s Day. These would be such a sweet gift to send to the moms, grandmothers, aunts, or moms-to-be in your life!
HOW TO CUSTOMIZE THIS PROJECT: Create custom shirts with someone’s name, their children’s names, a favorite phrase, or maybe a meaningful quote. This works great for ANY holiday – think about Father’s Day! You could create shirts for your children with a fun Father’s Day phrase, take a photo of your partner with your children, and then print and put it in a cute frame or photo album. You could also use this technique for other types of items like pillows, tote bags, storage baskets, and more.
DIY Custom Coasters Tutorial

If you’d like to create a beautiful gift for your mom, these custom coasters are the perfect idea! They’re unique, easy and affordable to make, and they’re something she’ll use on a daily basis. While you can easily create your own unique design (maybe your mom’s monogram, for example), you can also use the templates available in the Cricut Design Space! I used the “Drawn Floral Coasters” template from the Design Space software to create these beautiful floral coasters in less than an hour from start to finish.
How to Make Custom Coasters with Cricut Joy Infusible Ink Pens
MATERIALS NEEDED: Cricut Joy, Cricut EasyPress2, Cricut EasyPress mat, Cricut Infusible Ink pen in your desired color (I’m using Bright Teal), Cricut Infusible Ink Ceramic Coaster Blanks, cardstock or butcher paper, heat-safe tape (optional but recommended), Cricut Joy Light Grip Mat, blank copy paper

Step One: Create or Choose Your Design
Use the Cricut Design Space software to create your own design or use one of the pre-existing templates.
Step Two: Apply Copy Paper to Grip Mat
Cut a blank piece of copy paper to fit a Cricut Joy Light Grip mat. You don’t have to be too precise because we’ll be cutting away most of the paper in a few minutes.
Step Three: Print and Cut Your Design with Cricut Joy
After finalizing your design, it’s time to print and cut!
TO PRINT: Remove the Cricut Joy precision blade and insert a Cricut Joy Infusible Ink Pen in your desired color. Next, mirror the image in the software (just click the mirror image option when you initiate the print), load the Cricut Joy Light Grip mat with copy paper into the tray, and print. It’s SO fun to watch the Cricut Joy precisely draw the image onto the paper!
TO CUT: Once the drawing for the first coaster is completed, your Cricut app or software will prompt you to remove the Infusible Ink pen and re-insert the precision blade. Then simply initiate the cut on the software, and your design will be cut into the perfect coaster-sized circles.
Repeat this process with all four coaster designs.
Step Four:Find Correct Heat Settings for Cricut EasyPress2
You can always use the Cricut Heat Guide to determine the correct heat settings for your crafting projects. For this particular project, the recommended heat settings were 400 degrees for 240 seconds. Pre-heat your Cricut EasyPress2 to these settings while you prep your coasters.

Step Five: Prep Your Coasters for Pressing
Use butcher paper or card stock to line your Cricut EasyPress Mat to prevent any unwanted color transfer. The use a lint-free cloth to remove any dust or debris off of your Cricut Infusible Ink Ceramic Coaster Blanks to ensure a clean transfer.
Step Six: Get The Design in Place
Put the side of the coaster design that was printed with ink onto the shiny blank side of the Cricut coaster. You can use heat-safe tape to secure the design, but it isn’t 100% necessary. It simply ensures that your design stays in exactly the right place. I used my leftover backing from the Smart Iron-On material I used from the custom t-shirts I showed you earlier to secure the design, but next time, I’d invest in heat safe tape! Next, add a piece of card stock on top of the bottom of the coaster.
So here’s how your stack should look at this point: EasyPress mat, then card stock or butcher paper, then the design printed on the copy paper with the ink side facing up, the blank coaster with the shiny side facing down onto the design, and then a piece of card stock on top.
Step Seven: Apply Heat with Cricut EasyPress2
Apply the Cricut EasyPress2 onto your coaster stack at 400 Degrees for 240 seconds. You don’t need to apply any pressure, so you can heat press one coaster while you’re prepping the next coaster. The coasters will be VERY hot, so I’d allow for ample cooling time before touching your coaster or use oven mitts.

These coasters were so easy and fun to make, and they look absolutely beautiful in our home!
HOW TO CUSTOMIZE THIS PROJECT: There are quite a few custom coaster templates in Cricut Design Space, and you could also create your own design with a monogram, quote, illustration, or anything you can dream up. You could also add to this gift by combining it with a cute set of cups and her favorite drink.
Easy DIY Mother’s Day Card

No matter what type of Mother’s Day gift you decide to make, you’ll need a fabulous card to show her you care. The Cricut Joy makes creating custom cards for any occasion so easy, and they have a wide variety of gorgeous Mother’s Day card templates on Cricut Design Space. I am obsessed with this feature. You can literally create a professional-looking card completely customized for any occasion in MINUTES!
How to Make Custom Mother’s Day Cards with Cricut Joy
SUPPLIES NEEDED: Cricut Joy, Cricut Joy Card Mat, and Cricut Joy Insert Cards (I’m using the Princess Sampler pack)

Step One: Create or Pick Your Card’s Design with Cricut Design Space
Today I’ll be showing you the “I Love You Mom Card” and “Mom Folk Floral Card” templates, but there are quite a few more – or you can design your own with the Cricut Design Space app or software.
Step Two:Place Card Stock on Cricut Card Mat
Slide your selected blank card into the Cricut Card Mat as directed and align with the appropriate measurements on the mat. Press down lightly on the top to make sure the card is secured.
Step Three: Cut Design with Cricut Joy
After selecting your design, simply initiate the print. It’s THAT simple!
Step Four: Remove Completed Mat from Card & Insert Card
Peel back your card from the mat, and you’ll be left with a beautiful card. For this card, I used a holographic insert card from the Princess Sampler pack to add some magic.

I created both of these cards in a matter of minutes with my 2.5-year-old daughter by my side. She loved helping me select the design and prep the card, but her favorite part was watching the Cricut Joy print our design. I cannot tell you how easy this project was, and I am SO excited to make custom cards with our Cricut Joy for all future holidays and occasions!
So there you have it! Three incredibly easy DIY gift ideas for moms that are perfect for Mother’s Day or any occasion. You can easily customize any of these projects to fit your mom/grandmother/aunt/sister/friend’s personality with just a few clicks too!
After testing out my Cricut Joy and Cricut EasyPress2 with these crafts along with a few others I’ll be posting soon, I can confidently say that I 100% recommend both products – along with the corresponding materials and accessories available from Cricut. The products are intuitive to use, features amazing step-by-step instructions, and all of the accessories are high-quality and easy to use.
I am also BLOWN AWAY by the wealth of information and projects available on Cricut Design Space. This free software makes me feel like I am a professional designer even though I have very limited experience and natural talent. Anyone can use this software, and I cannot even begin to tell you how many projects I already have in mind for the future.
And guess what – the Cricut Joy and Cricut EasyPress2 are both great Mother’s Day gift themselves! If your mom is creative, she would LOVE these products!
Where to Buy Cricut Products

If you’re interested in making any of the DIY Mother’s Day crafts featured in today’s post, or maybe you have some amazing ideas of your own, head to to find all of the Cricut products you’ll need – including the , , and the corresponding materials and accessories. Happy crafting, friends!